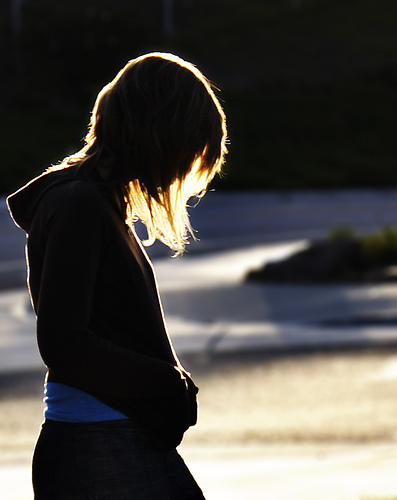
Back lighting –
Back lighting can help to add drama to an image and also can show delicacy of a subject. The way that backlighting works is where the lighting instrument, whether it be natural or artificial light, and the viewer are facing towards each other with the subject in between. This should cause the edges of the subject to glow while other areas surrounding the subject to become dark or darken in contrast to the light.
A Fill Flash may be used with a back lit subject to give even more lighting.
 |
| Digital Photography School |
Front Lighting –
Front lighting is used to light up the front of the subject for visibility and also to illuminate the colours that they are wearing on the person or their face if it’s a medium close-up. The flash on a camera is the most common type of front light there is. This type of lighting provides the most detail towards the camera of the subject which is directly opposite and that it is the easiest type of lighting to deal with because there are fewer shadows to confuse with the cameras light meter.
 |
| Front lighting of a lady with an Apple. |
Soft Lighting –
The term Soft Lighting refers to light that tends to ‘wrap’ around the subject or objects which casts shadows that have a soft edge to them. The softness of the light depends on two factors: The Distance that it is shot from, closer to the light source, the softer it becomes and the Size of the Light Source, the larger the source the softer it becomes. Portrait's generally use this sort of lighting unless it's a specific scene that Soft light is seen best lighting to use.
 |
| Soft light on a Sea Breeze |
Hard Lighting –
Hard lighting is light that comes from a single point source, for example a light bulb, and falls directly onto the subject without being reflected off another surface. It produces dark shadows and produces very high contrast pictures with deep blacks and bright highlights. The shadows generally have a hard or distinct edge. On models, using this sort of lighting will make the eyes look deeply set into the face and blemishes stand out more to the viewer. This sort of light can also be used for Landscapes, to capture the different curves and contours of the landscape instead of Soft light which would tend to make it look and feel flat.
 |
| Hard Light on Still life of Tomatoes |
Studio Lighting –
Studio lighting isn’t a scientific process and there is no right or wrong way to set up studio lights. Although there may not be a ‘correct’ way to set things up, it’s important to understand the different aspects of studio lighting. Most used lights in studio lighting for photographs are tungsten, fluorescent, HMI and Strobe. All these, excluding Strobe which is used in flash lighting, are typically used in Continuous lighting. Umbrellas and Soft boxes are the most common tools to use with Studio lighting. They both affect the light source they are attached to changing the way that the light affects the subject. The umbrellas reflect light back onto a subject but also diffuse it to create other lighting effects. Soft Boxes are used to provide a strong diffusion of light projection onto the subject. These two tools are the key to removing unwanted shadows.
 |
| The equipment used for Studio Lighting. |
Natural Lighting –
Natural lighting can mean either Sunlight or Moonlight. Both are good ways of capturing different moments in the seasons and different points in life or just times of the day. For example, in Sunlight, you can capture the summer days when everyone is playing or reading a book with the sunlight behind them acting as a natural back light for the photo or moonlight when you are looking up to the sky to see if there really is that man in the moon and the light from the moon is shining out, giving a nice natural lens flare in your camera lens. Or both Sunlight or moonlight can be used during Winter to get the natural sparkle from the snow, whether the sunlight is a dim yet powerful light to still make the snow sparkle or the moonlight is bright and makes the snow seem like it is a High-Visibility object.
 |
| Sunlight glancing down on a winters day tree. |
Torch Lighting –
This technique is known as painting with light, allowing us to illuminate precise areas of the chosen subject by pointing directly at the subject with your torch to create a spotlight effect on the specific area of your choice. The trick is to build up on the amount of light on the subject so that it is correctly exposed. This sort of technique can be used with any camera but working with Digital is much better than film because the exposure time and you need a bracket to stand more chance of getting good prints.
Laser Lighting –
This technique is also called Painting with light and this gives great results because it’s using Laser pens which come in a variety of colours. Once more, a Digital camera would be the better out of the two main cameras (DSLR and SLR) as you can see what you have created and then go back if there are any mistakes. Dark spaces are ideal for this sort of ‘painting’ because you don’t want any unwanted light sources interfering with your photograph.

No comments:
Post a Comment