
A2 Contextual Studies - Brief Analysis


Area of Photography: Landscapes/ Nature/ Animals
I would like research these areas of Photography because I find them really interesting to try and capture different compostitions of plants that exist in the wild and that of Animals that can be interesting to photograph. Also, when it comes to lighting outside, some lighting can really help give or take away detail on a photograph and it's really nice to get contrast in the photo as well and maybe sometimes it's nice to have just a focused object in the foreground and then in the background it's all blurry because of the depth of field.
Also, I feel that I would get more out of this photography because I would find it enjoyable to go on little trips to take different pictures, whether they be Digital or Film pictures, of the same items but with different angles and different camera shots.
Recently, I have used a digital camera to take some pictures of Ashtead Common and Epsom Downs. I went to Epsom Downs when it was rainy and windy because it was my Aunts birthday and we had to let balloons of for her. This was on the 21st June 2012. I got some nice pictures of the clouds and also managed to capture some horses as they ran past.
Also, I enjoy taking photos of flowers, using the zoom alot to get rid of any unwanted detail and so that I try and do what many photographers do that I've seen. For example, I have taken a photo of a flower that is orange with a white middle and I have also managed to capture two parts. One part is from one flower and the other is the part that comes from the same flower, but just another one that is next to it.
I also take photos of my Grandparents Canaries when I go in the Aviary to see them all and I find this sort of thing really nice because I can just stand in the Aviary with them and they don't seem to bother me and then I can spot a nice picture with 1+ canaries and they seem to pose as well (If you don't make it suspicious that you are looking!). At the moment, there are chicks coming out so I could possibly get a few pictures of the little chicks when they're mother isn't around.

5 Pictures of Landscapes/ Nature/ Animals

Valensole II, Provence, France
and it's quite effective with the looking up to the back middle of the lonely tree because people would expect it to be full of trees of all different sizes and I think that this works well because he has captured the colour of the flowers in the foreground and the loneliness of the tree in background. This picture is clearly done with a Digital SLR camera.

effective in the way that there is a large gap to one side of the dog as if it is waiting for it's owner (?) or someone to come and take it home.
The lighting on this picture is subtle and simple and this way it shows of the natural lighting surrounding the object. This picture would have been done with a Digital SLR camera.

I like the birds in the foreground look really nice compared to the background as it's as if the background has been edited on photoshop to give a smudged look to it and the foreground enhanced by this process. Also, the colours may be similar but they are really bright therefore standing out agains the darkened background. This photo would have been done with a Digital SLR Camera.

This picture may have been taken many times to get the right picture and maybe on different days to get the right position so the camera used would possibly would have been a Digital SLR.

This picture would have been created by a Digital SLR camera to capture the amazing colours and therefore give such a picture that made the world look perfect and calm.
Typography Photography poster: Experiments done by tutorial


These pictures that I have done here, are done following a tutorail that I was watching and I feel that my outcomes have pleased me because I didn't know whether I was making a mistake somewhere. The best ones I think are the one of Diagon Alley and the one of the Roses from Monaco because the colours add to the atmosphere of the picture. For example, in Diagon Alley, the picture was quiet a dark one anyway so I added to the picture with the colours of Red and Green and I think this turned out really well with the effects I used, like inverting the picture and adding a White background to help give a little help to the picture background. Also, with the roses I think the text colour helped to give the location a nice look and show that it was a well kept area.
The way that I created this is that I took my picture into Photoshop as a background layer and then separated them into the layers "Midtones" and "Shadows" This gave a 'Cartoony' look to it and I used a plain white background to fill in the other layer that wasn't used. I then merged these two layers to make them one and then created a new layer, for which I would use as a text brush layer.
On a separate document, I got the text that I wanted to use over the top of the picture, drew a text box and then copy and pasted the text that I wanted to use. The Font that I used was Edwardian Script which is a nice Italic font which works well over the top of these photos. I then deselected the text box and then went to Edit -> Define Brush Preset and made this text into brush that I could then use to 'Paint' over the top of my picture.
I went back to my first document and then I selected the brush tool, making sure the colour was on black and making sure that my layer selected was the empty layer. Painting the brush a few times in one size and repeating this step in many different sizes I got this look of many writing over the top, like the effect you get in films that roll across the screen. I tried to at least get one size that was really big with a few 'choice' words over the top that I thought really went with the photograph.
Markus Kison: Polaroid Pop-Up with style

Markus Kison does Polaroid Pop-Ups as part of his work and his a digital artist who is based in Berlin and by misusing data material he discusses social contexts. These come from the relationship that is between physical objects and their inherent digital information layers. At the moment, Kison is researching on the role of the contemporary human being ina digital augmented world and he has exhibited in various museums in the world and he has recieved many international awards and given talks at art and design conferences.
I like the work that Markus Kison has done because it's not everyday that Polaroids are used and these add a nice touch to them being a pop-up as it adds a 3D feeling to them and it's a nice effect to do as long as you know where you are cutting and know what exactly you are cutting out. I would enjoy doing something similar to this (Working into an exsisting photo) and just cutting out a specific shape to it and this could really help me with my future work with different inspirations.
I like the work that Markus Kison has done because it's not everyday that Polaroids are used and these add a nice touch to them being a pop-up as it adds a 3D feeling to them and it's a nice effect to do as long as you know where you are cutting and know what exactly you are cutting out. I would enjoy doing something similar to this (Working into an exsisting photo) and just cutting out a specific shape to it and this could really help me with my future work with different inspirations.

My pop-ups in the style of Markus Kison turned out really well. However, I didn't like doing this because I was rather stuck on what idea to use because generally working with landscapes is hard to do because you don't know what sort of areas to pick out and make it a pop-up.
Also, I found the tutorial hard because the girl was making it seem like it was really hard and not something that we would be able to do first time round as she was saying it took her a while to master it when we only had a lesson and it made me feel like I shouldn't be attempting something like this. But as my chosen theme area is landscapes etc. then I wanted to have a go in the end and I managed to come up with this. The way that you have to complete it, is just fold your picture in whatever way, as long as you have a flat edge to work with and then you have to get a pair of scissors and then cut in lines. The closer together the lines the more thiner your pop-up will be and vice versa.
To learn how to do the pop-ups in a pop-up fold, I would have to re-watch the tutorial and maybe gain some tips from a different tutorial on how to do this design. Overall, I enjoyed creating this in the end but I wouldn't use it if I could advoid it.
Lin Osbourn: Crop and Compose in a grid

Lin Osbourn has an ARPS, BA(Hons) in Fine Art but was awarded a scholarship to Harrow School of Art for her photography work and then went on to the study at the Surrey Institute of Art and Design, graduating in 2001 with her BA Honers in Fine Art. Then she went on to attend at the Winchester School of Art where she became increasingly interested in her Photography and has since been awarded an associateship by the Royal Photographic Society.
Osbourn uses a range of small detailed photographs to create her original artworks. The subjects are mainly ordinary objects which are taken from everyday life or even the natural world of leaves and flowers and by repeating these series of small images, Lin Osbourn has been able to change the original isolated context. 'En Masse' the images have a specific power and beauty.
She mainly focuses on topical themes and I think that all these photographs are really nice together because she uses a range of objects yet makes sure they have the same colour so that they all link in one way or another and not only by colour. For example, there are many packaging ideas on this piece of work by Osbourn and I think that it's really good because she's not just focusing on one aspect and that way she is able to get more detailed pictures.

My attempt at creating something similar to Liz Osbourne's style of cropping and putting into a grid on a sheet. I think that this attempt was really good because I got many flowers of the same colour and lined them up in a row. However, I feel that I could have either made the sheet smaller because I have this gap at the bottom of the page and the blue flowers are lined up at the side of the page which makes the page look unorganized. But also, the blue flowers at the side help cover up unused space because otherwise their would be a gap at the side and it would then look weird.
Here, I tried to follow the steps in the tutorial by Cropping the pictures down to a decent size and also using different parts of the flower to show because some of the picture had too much space around them to use properly and many flower pictures you see have half a flower in them because they don't want to give away the whole photo and maybe they think that half a flower is better than full flower. I used the crop tool on all of my photos of the flowers and then used the paint bucket tool on the background. It just helped give colour because I felt that there wasn't enough of a different colour on there and the white didn't look right for a background colour.
If I was to do this again, I would most likely use smaller pictures/ crop to a smaller size and have many more flowers and items of the colours that I have used. Personally, I think that I have followed Lin Osbournes example well and that my outcome is a start for me if I wanted to do something similar using Landscapes and Flowers.
Jan Von Holleban: Ariel Shots from above.. Looking down to the world!

Jan Von Halleban creates these surreal images using the ground as his canvas. He was born in a German countryside, Jan Von Hollebon lived most of his youth in an alternative commune and identifies a strong connection between the development of his photographic work and the influence of his parents, a cinematographer and child therapist. He followed in his fathers footsteps when he was only just 13 years of age by just picking up his Fathers camera and playing around with all sorts of 'magic tricks' to create these sort amazing pictures. His work has been internationally exhibited and has been published widely throughout the world. His favourite collaborators are: his friends and any pirates, fairies, dragons, monsters and punks that are about and also the sun behind some tiny clouds, Zeit Magazin, Neon Magazine Dazed&Confused, Geo and Steidl Publishers.
I really enjoy looking at these surreal images that he has created because not only do they look real but the scenes are really imaginative. Also, I would enjoy looking into the idea of doing some more big scale work like this because the variety of scenes that you can create just by using a small range of items and possibly art materials.
I really enjoy looking at these surreal images that he has created because not only do they look real but the scenes are really imaginative. Also, I would enjoy looking into the idea of doing some more big scale work like this because the variety of scenes that you can create just by using a small range of items and possibly art materials.


My group effort to doing an Ariel shots of the scene that was created. We created this scene where this girl is holding onto the balloons and that she is floating up to the sky with the balloons in her hand. We used blue sheets for the sky and paper for the grass and balloons. Also, we used fluff to make small versions of clouds and I found that this worked quite well to give the illusion that she was floating up to the sky.
In addition to doing this as a photograph, we also created an stop-motion animation to show that she was actually moving up with the balloons and that she also lost one on her travels.
I think that these ariel shots of the girl with the balloons worked well with the materials used and I would enjoy doing this sort of thing because you can create many different scenes with the use of materials that are locally sourced and easy to use on a wide range scale.
Doing this sort of thing in a group on a big scale also helped as we put our ideas together because that way we combined our ideas together and put more into doing he production and made the piece better with each idea and that way we could turn round and say maybe not or maybe yes, so agreeing or disagreeing as a team instead of one person turning round and saying 'No' and that be it. We were all given individual jobs to do so that we weren't left to do nothing.
Norm Magnuson: Natural Art, decorating the world in a range of colours!

Norm Magnuson paints and portrays his Natural Art in a variety of places, from being stuck on buildings to being put back into Nature itself. He was born in the 1960's and he is the founder of the Art Movement - Funism. He began his career creating allegorical animal paintings with pointed social commentaries. Eventually he became more and more interested in Political art and it's potential for persuasion. His decorating art is amazing to look at because of the use of colour and the many different designs that are shown throughout his artwork. This inspires me to do some of my own using my own materials, like marker pens etc because I would enjoy doing something like this and because I would like to try and experiment more with a range of materials instead of relying on paint which I don't currently have at home.

My leaf decorated in the style of Norm Magnusson and I feel that this technique is really fun to do because you can let your imagination go slightly and create something really new and memorable and leave it somewhere that it looks completely normal and then it would stand out against fellow Nature objects and therefore drags the eye to it, causing the public to notice their surroundings. So if I had done a whole collection of painting onto Nature, with different shapes and colours and a range of ideas then I could have done my own little mini-exhibition outside where the leaves came from and then left them there because the leaves would have flown away to somewhere different and then randomly fell down to settle on the ground again.
I would love to do this experiment again some time and I would enjoy it because there are many things you could do with Nature and painting and there are many designs that you can do to make the world a prettier place without even trying. Especially if you get a load of people to help you design the nature that you have collected.
Geraldine Georges: Combining a picture with different techniques and mediums

Geraldine Georges is a graphic designer from the Academy of Fine Arts in Brussels and she worked for many different advertising companies for about 7 years and towards the end of 2008, she started to work as a freelance illustrator and creating many different illustrations like the one above. She did not feel like she was leaving behind the world of graphic design elements but she rather was able to see and bring some graphic design into her illustration work that she has managed to complete.
The two are linked for her and her approach is pretty simple, trying to transcribe emotions and therefore trying to find the perfect balance through the collages without falling into a trap of over-using Photoshop and the brush tools. When I first looked at these, I found them not appealing to my taste because of the way that they have been created but now that I looked closely at the way that Geraldine Georges has created these, they aren't that bad as they do look interesting and they have a fantasy look to them in some of them and a depressed theme but they still don't appeal to me as much as they would do if I liked them. |

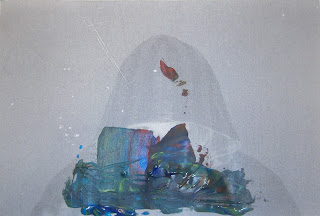
My group attempt at combing images with each other and putting ink and different techniques with each over the top to create this image with many different colours and splotches. I didn't really like doing this activity because I couldn't think on the spot on what to do with the pictures at hand.
We managed to get an idea and cut out half of the cathedral of St Paul's and we stuck this at the back of the mountain. Also, we stuck the other half just coming out the middle of the mountain to add this effect of the Cathedral being split apart. We also did these random swirls around the edge to add effect to it and made it more interesting to look at.
I personally I like the swirls that are at the edges of the picture and it gives it a 'wsipy' look to it. If I was to do this again, maybe in a different group, I would maybe add more picture images to it to mix it up a bit because it could make it more interesting to look at and maybe more ideas would come from this and just not having to think about what you want to add to the picture would be more useful because when you think about what you want to add, then your ideas get confusing and then you start to dislike many of the ideas that you want to do.
Like most pictures, Landscapes are harder to experiment on because of the fact that there is generally nothing in them and therefore making your creativity work harder to come up with an idea to do so with this experimentation, I would use a combination of Landscapes, flowers, animals and possibly people to make my work better in a group.

My Photoshop attempt at doing a picture in the style of Geraldine Georges went alright because even though I thought that it didn't turn out well, it was a quick and simple tutorial to follow one you understood that you just have to take a picture, and take the parts that you really want to use from the picture, for example for mine I have used a rock that I took a photograph of and I took a chunk out of the edge to make room for some swirl brush pre-set and some dabbing of the green colour to link in with the moss on top of the rock.
I personally don't like doing this in the style of Geraldine Georges because of how she just draws lines and has random shapes in places it makes it hard for my mind to make itself up on where to place things, such as the shape in the background and it gets a bit confusing. However, when working in Photoshop, it is easier to do because you can work on individual layers so that if you don't like something, then you can always delete it and start again without worrying about deleting anything else of your own work.
Maybe for another experiment I would tie in Geraldine Georges and the Typography Landscapes because maybe I could work something out with the way that this has been done so that I could get something that I liked out of one thing that I don't like and one thing that I do like.
Jamie Beck - Slightly Animated

Jamie Beck and Kevin Burg, combined,do these amazing animated GIF's/ Cinemagraphs using the most simplest ways. They came together and using the skills of both of them, Kevin Burg for the animation and Jamie Beck being the fashion photographer, they have managed to create a range of GIF's and I think that they are really effective. Capturing the right moment to make the person who looks at them remember a similar night to them or if it is of that person, make them remember that night. It also reminds me of the moving photographs from the Fantasy-film Harry Potter where the pictures on the wall were able to move and talk to the students and therefore telling them stories about the picture that they have been put in. This could be a step in that direction with the use of animation and photoshop and I think this is really clever.
The two came together in 2009 to begin experimenting with this style of GIF and they married the original content photography with the desire to communicate more to the viewer birthed with cinemagraph process.

My idea for this was just a random thought that just came to me because I was sitting and staring at my iPod. However, I do enjoy taking out my iPod and putting back in my case so I wanted to show the process of it going back into it's case. Thinking back to the activity, I should have done the process of taking the iPod out and putting it back in.
To create this sort of animation, I used Adobe Photoshop which you wouldn't think of using to create an animation because if people said they are going to make an animation they would think about using Adobe Flash. Using the program and a written tutorial, I followed the steps given to import my photos as a stack and then I brought up the animation window to begin duplicating the layer and then making the layer invisible. I did this for the most of my layers and then I saved it for Web Use. This allowed me to upload it to a separate website, then I used the Web URL to embed it on my blog.
If I could do this task again, I would use a different idea and maybe use more materails. Like, using the idea from Jamie Beck and keeping it simple by using an object that moves slightly and using a fast shutter speed to capture about 10 - 13 scenes and then follow the tutorial again to get something better and more effective that could possibly tell a story.
Abigail Reynolds - Paper cutting her way through!

Abigail Reynolds paper cut is very interesting to look at as she combines the two scenes together. She took a BA in English Literature at St Catherine's College, Oxford University before taking a MA in Fine Art at the Goldsmiths College in London. She is represented by Seventeen Gallery in London and Ambach and Rice in Los Angeles. She has recent solo shows, include The British Countryside In Pictures at the Seventeen Gallery in London and A Common Treasury at Ambach and Rice.
I sort of like this work done because you can express two different scenes with just cutting and then you can see both and compare. Even though the top picture could be ruined, it is a great way of having two contrasting photos yet putting them together to show a the different sides and also you can find that this exercise can be useful to go with the flow and just add in random shapes where you feel need to be and that way you don't think much and also, when choosing opposing pictures, you can see what's in them. Even using an old picture of one place and the recent photo can be good because it shows progress in todays society.
I would enjoy using this mode of experiment for future tasks because there are always endless opportunities to use it for.

My idea of cutting random shapes into a picture and then also cutting the word 'Sun' out of came to me differently because I didn't want to follow the 'tutorial' closely and I wanted to do something different. Also, that way, I could reveal more/less about the picture at the back but keep the front picture in tack and still show what it was. Also, it could be done this way because it shows specific areas that I wanted to show instead of showing it through a series of squares. Also, I put the word 'Sun' at the top, because that's where there was space to write it and also, Suns are generally at the top of anything and I wanted get some of the top of the trees in the behind picture.
If I was to do this again, I would pick two different photos that are both of landscapes, but one that is dull and doesn't have much light in the picture compared to the other picture which has loads of light in and therefore gives a nice contrast. Also, I would try and do a pattern of shapes in a circle or something to make the shapes the same and add a nice symmetry to the picture. This makes a nice first experimentation for any future ideas that I could have.
A2 Photo - Enhanced Image Brief

The brief is about going with our chosen theme. I was going to do Landscapes but on thinking about it, I would be very limited on doing Landscapes so I have changed to Documentary where I can use my ideas on taking many pictures of Canaries, Flowers and many different other ideas that could link within this whole idea of documenting the life around us within nature. I think that this would work well for me because of what I really prefer to take photos of. I have been looking at some people already over the Summer and I have found some really interesting people.
This project brief is OK to me but I can work with it and make it to fit and make it work for what I was to do for my final project. The ideas that I have is to have different photographs of different things but then make a link with them all. Especially
Mindmap - Enhanced Image of Documentary Photo ideas

This is my mind map for ideas on what to do for the project so far and how the many different aspects of the topic could be interpreted. It also includes Landscapes which was going to be my first theme but because of the fact that landscapes can be a restricting theme, I can do documentary and have it expand over to many others, including Landscapes.
My favourite idea so far seems to be of doing architecture with some perspective shots to give it a taller or shorter look and make it look different. Especially if it was in black and white, giving something a retro/ old-look.
Moodboard - Collaboration of artists

1) http://www.nickvanderleek.com/2011/05/wedding-photography-tips.html
2) http://www.miltonrogovin.com/morejon.html
3) http://twoeightproject.wordpress.com/category/documentary-photography/page/2/
4) http://www.paulunderhill.com/documentary-photography/documentary-photographer-iphone-photos-captured-moments/
5) http://sdrphotography.com/documentary-photography-brighton-photography-brighton-sussex-south-east/
6) http://www.londontown.com/LondonInformation/Recreation/Thorpe_Park/a86b/
7) http://www.londontown.com/LondonInformation/Recreation/Thorpe_Park/a86b/
8) http://www.eexploria.com/impressive-architectural-photography-tips-and-examples/
9) http://photographerswedding.xp3.biz/?p=183
10) http://www.designzzz.com/most-beautiful-flowers-photography/
11) http://www.dyscario.com/arts-and-culture/30-beautiful-examples-of-flower-photography.html
12) http://www.flickr.com/photos/46143783@N04/4475623056/
In-Depth Analysis
 |
| Front of house, Gate closed |
The photographer who took this picture is called Steve Robinson and he is an interior, event, portrait and packshot photographer. He is also a commercial, advertising and portrait photographer who is generally based in Brighton but he works all over the South East and Sussex. I think this photograph would be classed as architecture and, in terms of the photographer himself, would be classed as interior/exterior photographs. However, I think that these terms work well anyway besides the fact that it could be classed as something different. This photograph looks quite recent so it could've been made within the last 2 years or even before that because as this house looks quite rich, as in the design is quite rich looking however, the reason it could look older is because the photograph is in black and white, therefore giving it a range of contrasting colours and a lot of detail can be missed out but it wouldn't matter because it could add to the whole idea of it actually being like that.
This work could have been made for a project or just to sell to the public who want a piece of artwork on their walls at home and also they want something to liven up their walls, even if it is in black and white. Robinson could have done this work, also, out of his personal interest because he enjoys taking photographs because of the skill it requires, like controlling the lighting and composition. Also you would have to either get permission to use their land or just go ahead and use the space because there really is no one in the photograph who could have a problem with having their photograph go online for a portfolio.
I chose to look at this piece of work because I found it online and I thought that it was quite clever to see how black and white can change a picture from looking dull in colour because of the many colour situations going on, to something that has little as 4 colours in it and a lot of contrast being shown via the many variations of colour. I also want to try and do something similar to this and possibly use architecture as one of my main themes and I could mix this to do with many different ideas.
This photograph could represent the blocked entrance to someones house where you can't go in or you're not allowed to go in without invitations. Also, it could show, because it is a rich-looking house, that it's being secure and not letting anyone at least look at the house because of it's worth and the gates are shutting 'peeping toms' out.
I enjoyed looking at this work because it's in black and white and I feel, after doing many other photographs with colour film, that black&white film is better and less stressful as colours don't matter in black and white. This work has inspired me to do some photographs using black and white film and also try just doing shots of houses and other sort of buildings around me so that I can get a variation of pictures that I can use later on to experiment on.

Double exposure
This photograph is done by Dan Mountford who is a Design and Illustrator but he also does Double exposure on his photographs and I partically find this one really effective yet calming to look at. Also it is very simple and cute. Plus, there is more of a theme to this, where the girl is standing and there is also a picture of the girl in the middle of the figure itself. The colour is a really simple tan colour and the colour seems to be textured in the middle of the photograph or this could be all over and it is easier to see around the middle because there are layers of colour. The double exposure sort of thing really works and I would really try to experiment with this.
The whole meaning of this photograph could be that it's showing the innocent girl in the middle of the photograph and they are using butterflies because they are sometimes used for representing innocent people, if they are female. This also show the girls age because some children/teens like to look at pretty coloured butterflies and also they enjoy drawing of them. I think this work has a simple and relaxing theme because of the colours used when it has been double/triple-exposed over in the specific sections.
I really like this work and I would totally use this idea for some of my experiments because I think it would be worth it due to the outlines of some of the shapes you can get. Though if I tried this, I would be cutting out a shape in the picture that way I have specific details isolated in the shape or I would just cut out the piece of paper in the shape I wanted and then place that in the middle of the paper and then I could have a shape with the photo on and then a white space in the middle of the photograph to just give the idea. I would have to try it to see if it properly worked or not.
 |
| Tree alone |
This is taken by a Landscape, Fine Art photographer who I found through research online, looking for landscape photos. The photographers name is Charlie Waite and I really enjoy looking at his work because it is mostly landscapes and I am into Landscape photography. But as I decided, landscapes for me, are too restricted in locations for me to do over and over again. This particular piece of work doesn't have a name, or one that I am not sure about but I would name it Single tree on the horizon. Charlie Waite is a fully accomplished landscape photographer and is one of the worlds leading photographers. His style is often considered to be very unique, in the fact that his photos convey almost a spiritual quality of serenity and calmness. He received a prestigious fellowship award to the British Institute of Professional Photographers (in 2000) and in early 2007 he was presented with the Amateur Photography's Power of Photography Award.
This seems to have been taken on a Digital SLR camera from a distance so that you can get a nice landscape in the background to the tree. The meaning of this photograph could be something to do with the tree and how it's the only one in the photograph and possibly the only one in the area where this photograph is being taken and that it is surviving on it's own where nothing else is. Could be saying that it is surviving better than it would if it was in a pack or just generally doing better than the other plants and that you don't have to be with others/ friends to enjoy what you see around you.
I really like Charlie Waites work because it's something I would really enjoy going out to do, like going to other countries or going to many countrysides to take the photographs similar to this. If I had the chance during the school holidays, I would go to many different countrysides to take as many different landscape photos I can at different angles.
 |
| Original |
 |
| Edit |
This Vignetting example was the easiest of the two and I don't know if I really like it or not. I like how the black outline has framed the whole thing but it hasn't really edited it much. The tutorial itself was really easy to do but I wish I had done it slightly better and edited the photograph beforehand. However, I do think that I could try and use this when in the darkroom when using my negatives and I could try something like this and I honestly think that this effect would be worth doing because black and white framed with black is a classic way of making it look quite nice and contrasted.
Following the tutorial was easy and I find the steps quite simple so I would try them again, with different pictures and different settings with the different amounts of contrast. Because I am wanting to try new things, I would do this tutorial, alongside another on this photograph to see what different effects I can combine.
 |
| Vignetting, combing different techniques |
As an example of combing different techniques on photoshop, I took a photograph that I have taken myself and edited using a filter on my photograph I made the picture look like an old fashioned photograph. The techniques that I combined was that I used the colour and saturation and contrast to give this sort of Sepia look to the photograph and then I added the vignetting oval around the photograph to add a nice olden style look to it. It also adds a 'cold' sense of style and seeing as this was taken when it was frosty and cold, it helps make the point of the cold.
 |
| Original |
 |
| Edit |
This example, a version of the Nashville effect you can get on the application Instagram that people who have an Android Phone or an iPhone can get and use on the go if they have a wi-fi connection. This was a slightly easy tutorial to do however, because it involved using some simple techniques on photoshop, such as Brightness/ Contrast and Curves and you can play around with these settings many times to get the desired effect that you want from the photograph. I enjoyed doing this Nashville effect on photoshop because it helped me learn a new way of editing photographs.
I chose this photograph as it had a nice contrast of the different colours between the green of the water and the whiteness of the duck and the outcome works really well with what the guy was saying on the trailer. Also, I think that this outcome could be used for use on other photographs to see what outcome I get and if I don't like them, then I can use different numbers to reach the different shades of contrast. I think that I would use this tutorial later on to create many different contrasts in the photographs.

These edits are done using a Tutorial to made them HDR and I think that these turned out pretty well. The detail in the pictures has improved, compared to when I had the original picture. I think that this way of editing a photograph is really useful but I don't want to use it for another of project because I would have other ways of enhancing the images that I have.
In these two pictures, I have made the edit look blue-ish because it looks quite nice and the blue helps the photograph to stand out instead of the mix of colours in the original photograph.

The use of the different colours in these edits helps to pick out and define images that were lost in the originals. So, for example, in the picture above, even though they are there the tiles on the ceiling are invisible to the camera and to the eye. But when I enhanced the image to the right they have become darker, showing that there are tiles on the ceiling, even if they are still quite faint.
Even the crease on the shirt is faded on the original and therefore, when enhanced the creases look like someone has used the burn tool on his shirt to bring them out.
This tutorial was easy to follow and gave me some interesting results and I think that if I was to use it again, I could definitely use it to pick out some details that could have been lost in the original picture.
Spiral Tutorial - Multi-Coloured lines..
This tutorial was quite interesting because I was just searching on Youtube for something to do when I came across how to do this sort of effect and I liked the look of how the end product turned out. To do this, I used the pen tool to create the curves in the line and then I use the Stroke too to simulate pressure and size of the brush tool and it gave me the on the pen line. I then used a new layer to colour the line in and I didn't have to worry about being specifically on the line as I would have a way to clip the paint into the line shape anyway and there would be no colour out of line.
This tutorial was quite interesting because I was just searching on Youtube for something to do when I came across how to do this sort of effect and I liked the look of how the end product turned out. To do this, I used the pen tool to create the curves in the line and then I use the Stroke too to simulate pressure and size of the brush tool and it gave me the on the pen line. I then used a new layer to colour the line in and I didn't have to worry about being specifically on the line as I would have a way to clip the paint into the line shape anyway and there would be no colour out of line.
I like this effect and the way that the lines spiral around the object that I chose, though I do think that the image would have looked better in black and white as then the colours on the spiral would not almost blend into the background and it would give the image the look of where the light is being shone on the picture and captured on a slow shutter speed.


Lomography Effect Photograph
 |
| Lomo effect |
This Lomography effect tutorial was really interesting to do because of the type of end result that comes out. Lomography combined with a vignette around the side, gives it an interesting look to it and a soft frame that helps the image take pride in what it's showing. The idea of the splash being left alone with no blurring around the edge helps to show detail in what the main focus should be on, however when using this circle tool on Photoshop leaves a white ring from where I selected the main subject and I don't like this and I did try to get rid of the circle but it didn't work.
To achieve this sort of effect in Adobe Photoshop, I used different colour levels and for the blurring technique, I used Gaussian Blur but I think that I would use the blur effect less because it then would keep the detail of what the area was but then I would also keep the background fuzzy so that there would be a mix of clearness and fuzziness.
Lesley Davids - Paint on photographs
 This image is of a friend of mine and I took this picture a while ago but I wanted to experiment with it. I also copied it because then I wouldn't be painting on top of

Digital Double Exposure
Handmade Negatives
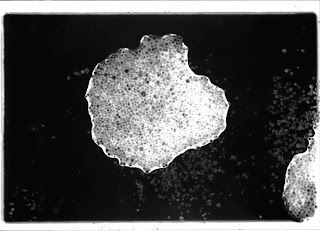
Handmade negatives are made by using a range of many materials, such as acetate, on a transparent surface and by placing it into the negative carrier in the enlarger and from there, you just print out your photogram/photograph like normal to give handmade effect instead of it always being digital.
 I quite liked this way of editing/ making a print more interesting because it just makes them more interesting to look at and gives the viewer a chance to create their own ideas on what they want to see, in a way, allowing the viewer to create what they see on their own instead of forcing an image on them. For example, the one above looks like a germ cell from when you look in a microscope at someones blood cells and it's a living organism.
Two of these below remind me of blood that has been spilt and that someone has captured this in black and white, like it has been taken at a crime scene

How is the work so far?
 This image is of a friend of mine and I took this picture a while ago but I wanted to experiment with it. I also copied it because then I wouldn't be painting on top of
 |
| Adobe Photoshop experiments |
 |
| Adobe Photoshop experiments |
Digital Double Exposure
 |
| Digital double exposure on Adobe Photoshop |
Handmade Negatives

Handmade negatives are made by using a range of many materials, such as acetate, on a transparent surface and by placing it into the negative carrier in the enlarger and from there, you just print out your photogram/photograph like normal to give handmade effect instead of it always being digital.
 I quite liked this way of editing/ making a print more interesting because it just makes them more interesting to look at and gives the viewer a chance to create their own ideas on what they want to see, in a way, allowing the viewer to create what they see on their own instead of forcing an image on them. For example, the one above looks like a germ cell from when you look in a microscope at someones blood cells and it's a living organism.
Two of these below remind me of blood that has been spilt and that someone has captured this in black and white, like it has been taken at a crime scene

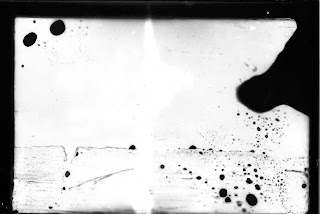
This image is the reversal of the one above and this sort of handmade negative effect is really unique and I would be interested in doing something like this again and creating something really gothic and dark to go alongside a theme because it'd work really nice and could connote many different meanings.
Jake Raynor Photography - Light Leaks
 |
Jake Raynor Photography - Light Leaks
|
 |
My attempt at using Adobe Photoshop to create light leaks
|
How is the work so far?
During the AS-A2 project work and during the new project, I
have been experimenting different techniques to gather ideas and inspiration
for my roll of film.
The experiments I enjoyed doing was bleaching because of the
way that the bleach took the colour of the picture itself and I also used some
of my dark black and white photographs which then the bleach just lightened the
photographs so I could see what the photo was more clearly. I also enjoyed following a tutorial for
typography landscapes and these are really easy to do but if I was to use this
for my final idea, it would get slightly boring to keep look at so I want to
keep them for experimental purposes.
In-Camera double exposures were difficult to do and I didn’t
really find them interesting to do because of the difficulty and also I
couldn’t really link it to something that I wanted to take photographs off.
Another thing that I enjoyed working on is vignetting on
Photoshop because I liked the whole idea of it framing a picture and selecting
the middle of the image to be in detailed focused and leaving a soft edge
blurred around the middle to give it a nice framed border.
On my own, I have researched different tutorials to test out
on my own photographs and they have turned out pretty well and that I have been
proud off but I wouldn’t really take them further because I don’t want to get
carried away with the experimentation because they are quite simple to do. The
techniques are doing different colour swirls around a person or an object to
highlight that specific object whether it is in the middle of the page or on
the edge of the page. I enjoyed this because it could make a picture look
comical or just enhance it with colour if the photograph is black and white.
I found a tutorial on doing purposely done light leaks on a
photograph to add that extra light to a picture, therefore enhancing it to a
better standard or just adding texture/ a small meaning to it or encouraging
the viewer to wonder what happened to the picture itself. I enjoyed this
because it can be done anywhere on the photograph and with the right colour is
could look naturally done.
One of the experiments that I really didn’t find most
interesting is Solarisation both in the darkroom and on Photoshop. On Photoshop
it didn’t give a nice look to the photographs that I used and I didn’t like it
in the darkroom due to the fact that I when I tried to do it, I would probably
be too slow to get the print from the developer back under the light again to
expose the print before putting it in the developer to re-develop. Every time I
tried this, it wouldn’t work and before it’s been re-exposed, the picture would’ve
already developed and there wouldn’t be no point in trying to develop it.
Another experiment that I didn’t like doing was using the
idea of Leslie davids where we had to paint on the photograph because using a
substantial amount of paint on top of a photograph takes it’s time to dry and I’d
have to take a picture of the final outcome with the brightness of colour
before it dried and dulled down. Also, the paint would sometimes get everywhere
and I wouldn’t know where to get rid of extra paint. The effect created,
however, was interesting but I doubt I would want to use this for any final
outcomes because of the simple fact that I enjoy taking photographs of nature
and animals and most of the time some of the pictures captured don’t come with
things to paint over the top.
When we had to experiment doing something inspired by
Geraldine Georges on the computer and I didn’t like it because it was a similar
thing to do with Leslie Davids and I couldn’t really think of what to create
with shapes and something landscape-related because of the limits that you can
get with landscapes and animals and nature.
My first ideas for my roll of film are:
That I was going to go to a library and, with
different peoples permissions that I could take photographs from over their
shoulders to see how they are holding their book, sort of interrupting their
daily routine and how they are reading the book, if they are holding the book
by the spine or if they are holding it by the pages that have been and gone and
the pages yet to come, also leaning the bottom of the spine of the book on the
table.
That I was going to go to a park that I have
access to and, as long as the floor isn’t wet, lay on the floor and look up at
the tree to get a sort of perspective view on the tree, seeing up through the
branches and into the life of a tree. Like the person is looking up into the
tree that doesn’t realize what is above them and looking up at the sky through
leaves and branches.
That I was going to go buy a colour film from a
place like Boots, to photograph flowers because I can get nice detail on
flowers from a colour film and I could also use this idea on insects too
because this way I can use the technique of bleaching on colour photograph
because that way I can pick out the best subjects in the picture.
Mindmap - Many different ideas
 |
Ideas to do for my final outcome
|
 |
| Retro looking Tricycle |
Final Evaluation - Final Outcome
This project has been interesting as we have learnt a lot of new techniques and been able to experiment a lot with our photographs when we have printed them out. Also being able to make handmade negatives and use them to create interesting shapes and outcomes are a good idea and it's something I can think about doing later on if I wanted something interesting to do and something that I can use for double exposure in the darkroom

My final outcomes that I created turned out nice but I don't know if I really like it in a way because of the way that the whole pictures are overlapped over the top and that they are stuck in that position because some of the photographs are dark but I think that the overall idea that I had was a really interesting one to look at as you have to be able to hold it up to a bright light to see through the layer of tracing paper that there is. I have changed this and keeping the tracing paper prints single and still stuck against the board, letting them still be hung up against light so people can see different details.
My inspiration came from a photographer who was called William Eggleston who documents retro looking items, such as a tricycle that has a retro look to it and I think that using also my nan and grandad's slides to add to the effect and also turning them into black and white photographs from colour slides. I used these because I wanted to see what my family was like back in the old times when they were slightly younger and then compare it to my friends and family now. The idea of slides and windows came really from the fact that I have the slides and I could create pictures that people would have to hold up towards light to get the full details.

When turning the slides into black and white photographs, it went through the stages of having to do a reversal of the solarized picture because the originals were in colour. This wasn't a problem although doing a reversal takes about 20 seconds to do and then I have develop like normal. When I did the first negative/solarized picture I didn't let it dry so when doing the reversal and I developed it, the border looked like a grunge effect and I really liked this, adding to the feel of something old.
To add to these photographs, I embellished the black and white photographs with thread, highlighting specific areas, like the lips on my aunts photograph with red thread. I also linked them all, making them linked so they hang together using the thread that I used from the photograph to hang it to the next. This links to the idea of memories by having the thread linking to my family through their memories and the thread that is left over isn't connected, therefore leaving it to the imagination of the viewer to show the unfinished memory and showing that it is still in progress of being finished as life never finishes and memories are always being made to keep documented.
Overall, I think I enjoyed this project and learning some of the many techniques that we have covered and I would enjoy taking them further to develop something unique and interesting. Combining techniques such as Vignetting and something similar to a lomography effects on Photoshop to give a interesting yet different look to it.

You naied it. You are really good editor. You've done a great job editing photos. You're inspired by photographer William Eggleston but how? Did you read his book or any materials that help you to boost?
ReplyDelete